

Blink Client Key
Before using our APIs, we recommend requesting a client key. A client key is a unique identifier used to register your blink in the dashboard. This registration gives you access to:- High-performance caching solutions
- Customized metadata
- Individualized status messages (
onSuccess,onFailure, …) - Analytics
YOUR_SECRET_TOKEN.
The
X-Blink-Client-Key header is optional. You can use our API endpoints without a client key, but you’ll miss out on the features mentioned above.Blink Data Types
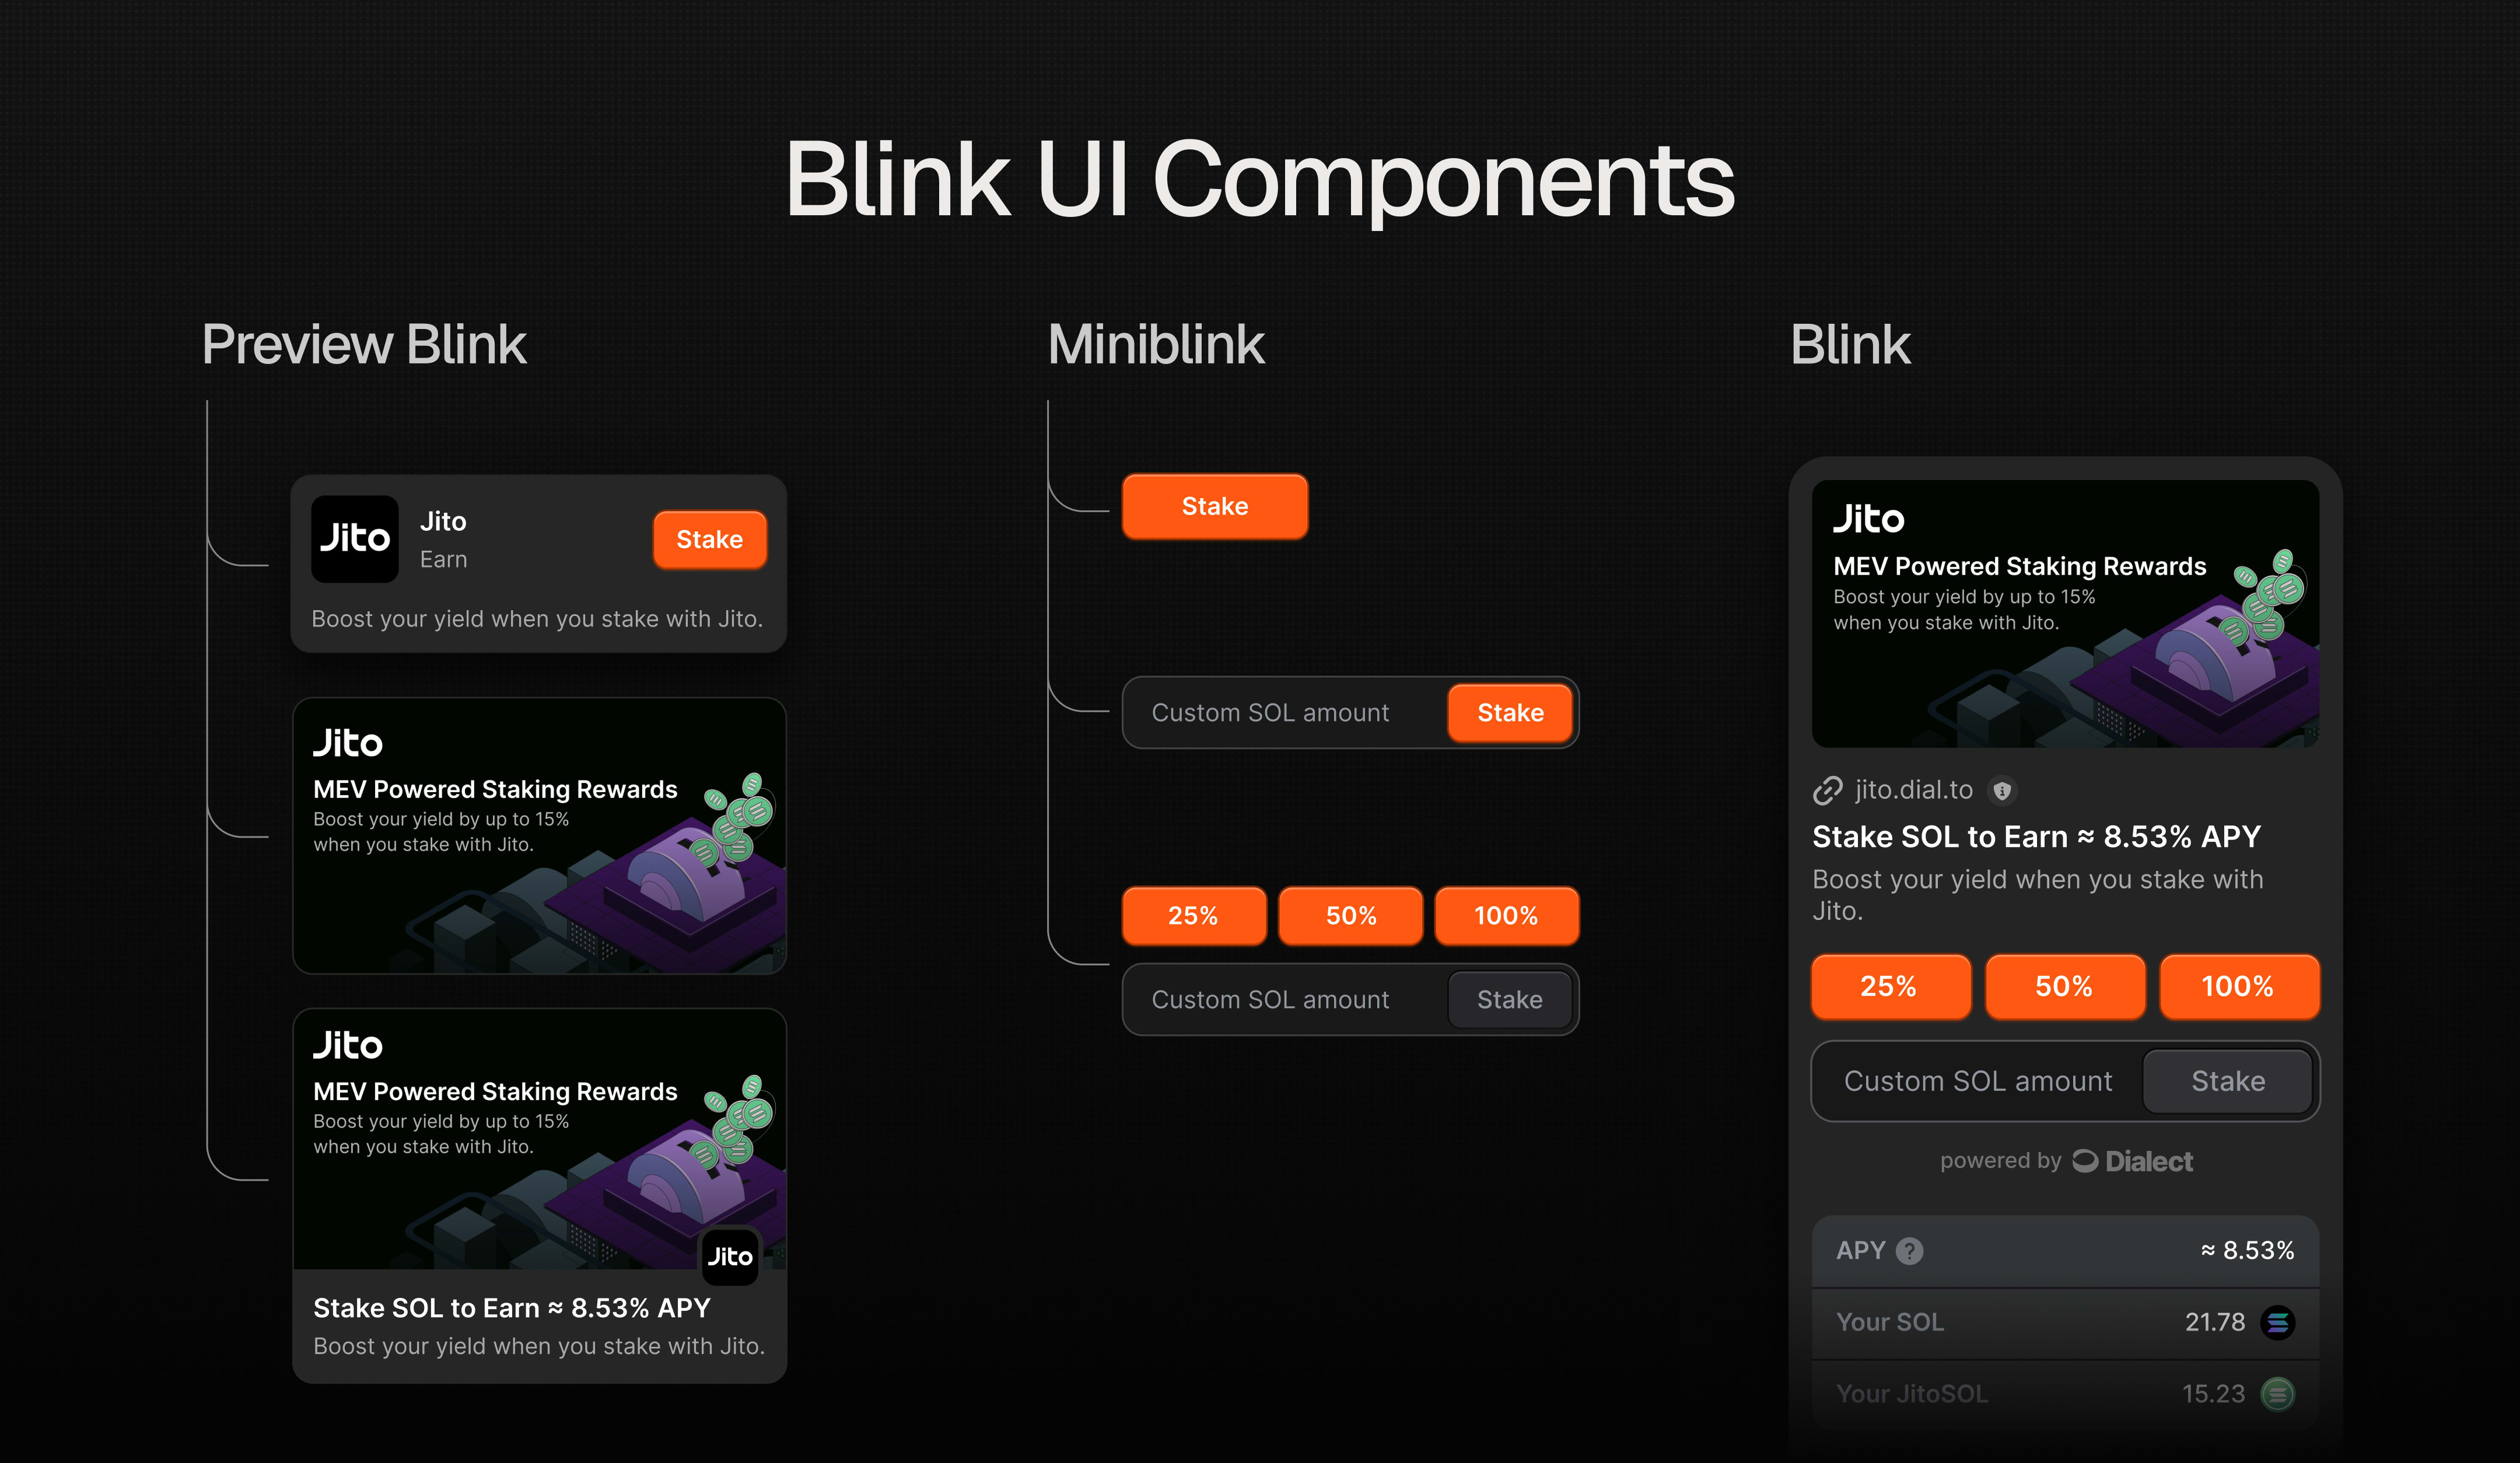
Dialect’s APIs provide three endpoints for fetching blink data:Blink, BlinkPreview, and BlinkDataTable.
 The
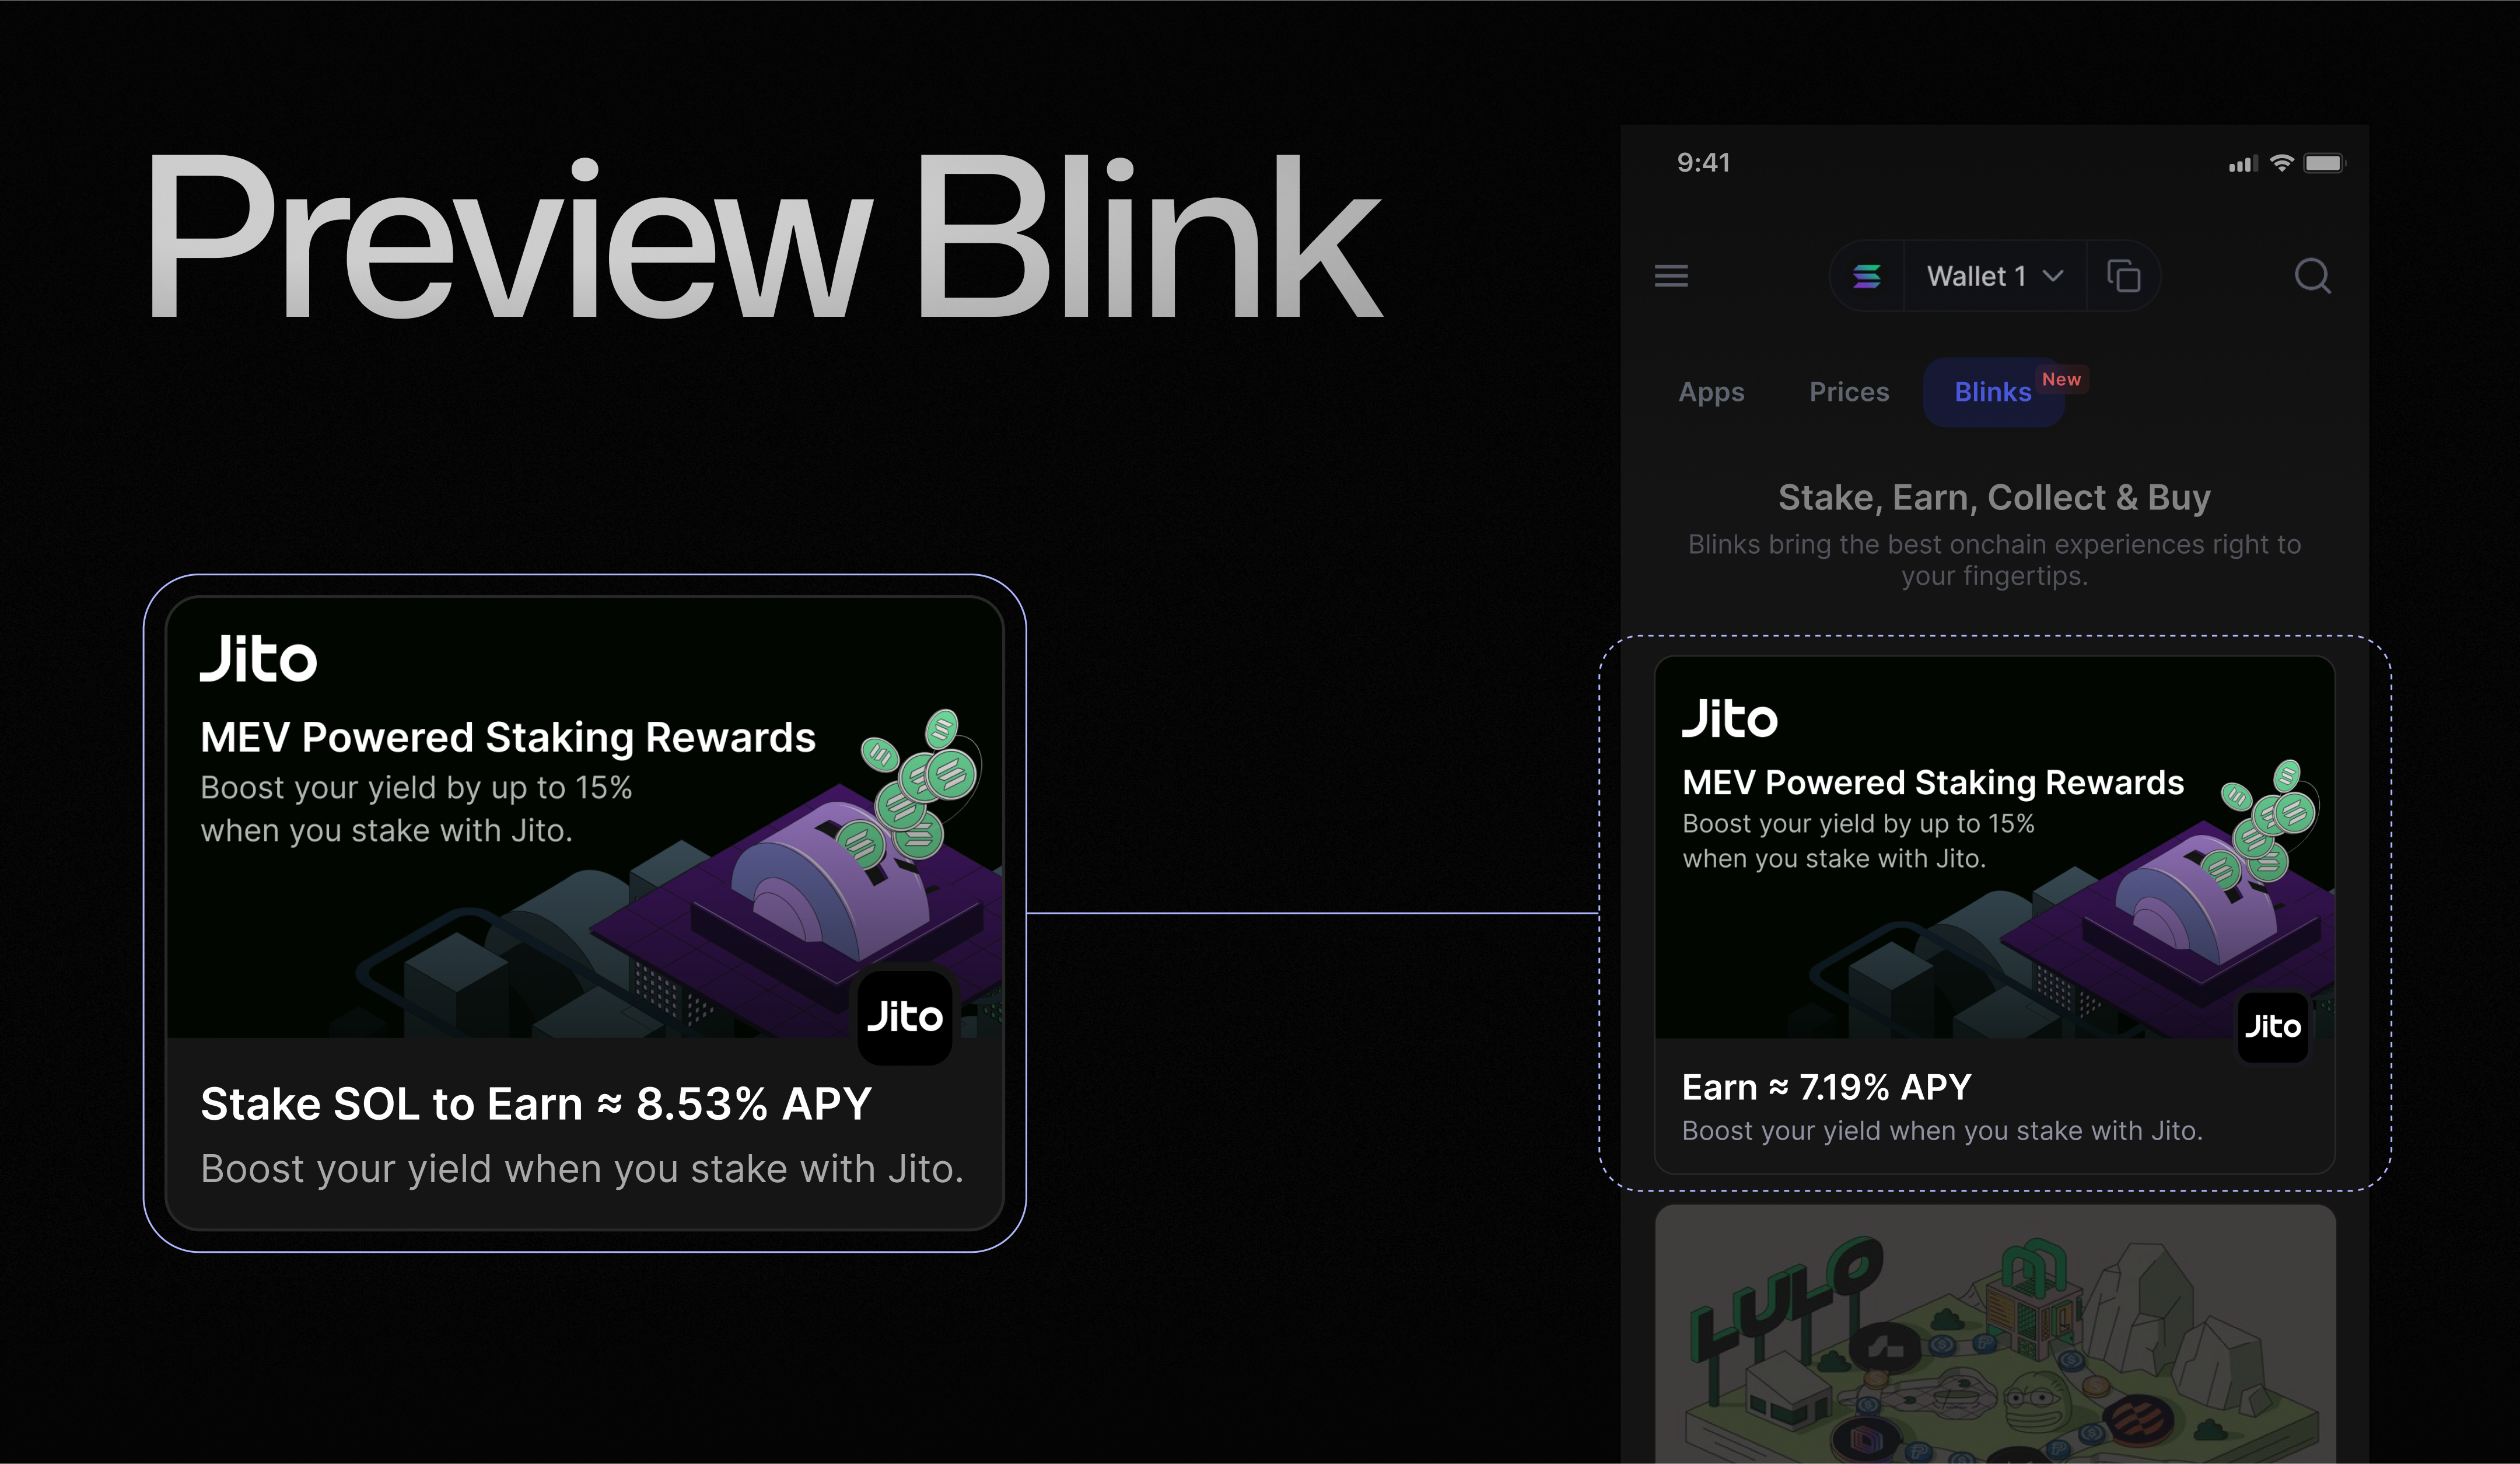
The BlinkPreview allows you to display a preview version of the blink with its own title, description, and image. It can be used for marketing purposes or in cases where you only want to render a preview without needing the full blink data.
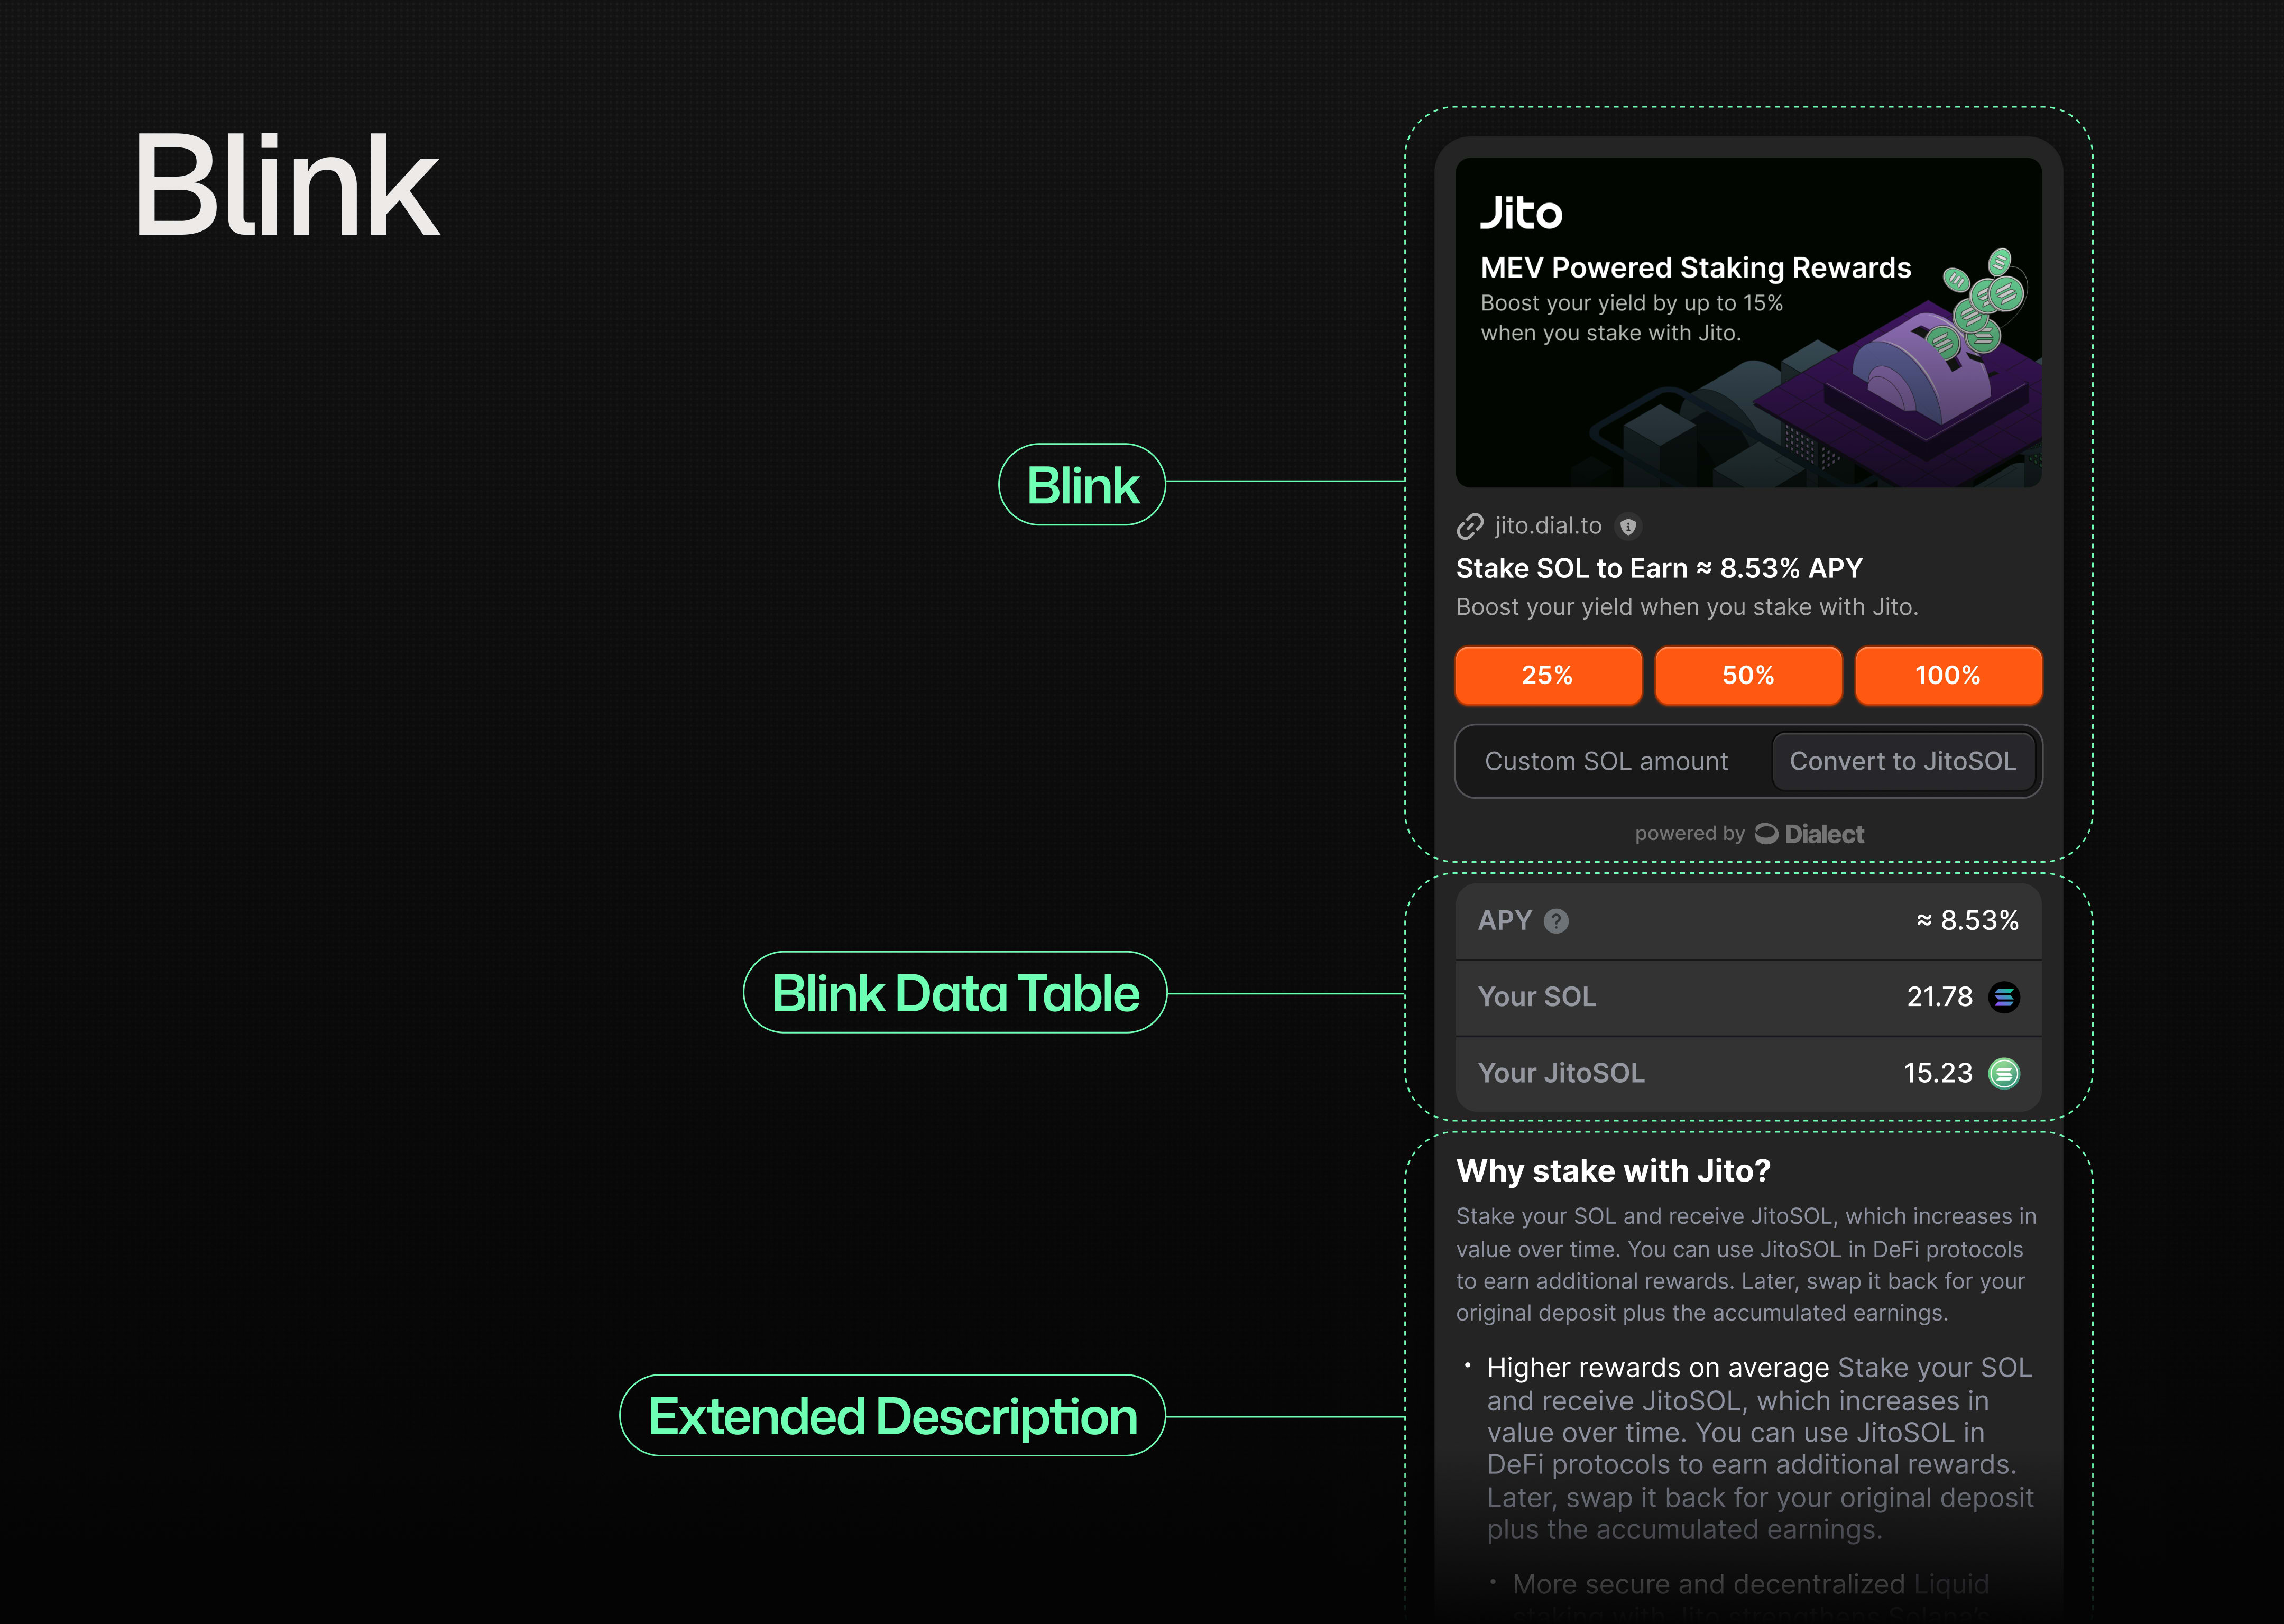
The Blink endpoint contains all blink-related data, including its actions and the BlinkPreview. Use this API when you plan to interact with the blink.
It is highly recommended to use the Dialect API when fetching a blink to benefit from all the additional features our SaaS platform offers.
In the following example, we’ll use the stake blink from Jito to guide you through the different API requests.
GET Requests
The GET endpoint returns a JSON object that renders the blink or provides blink-relevant data, such as the BlinkDataTable.
Fetching a Blink
A Blink contains the complete, interactive data structure. It includes all necessary information to display and interact with a Blink, including its current state, possible actions, and related data.
This is the primary structure you’ll work with when implementing blink functionality in your application.
 There are no strict requirements for image dimensions, but we recommend using either 16:9 or 1:1 aspect ratios.
JSON object that can be used to render the blink.
Fetching a BlinkDataTable
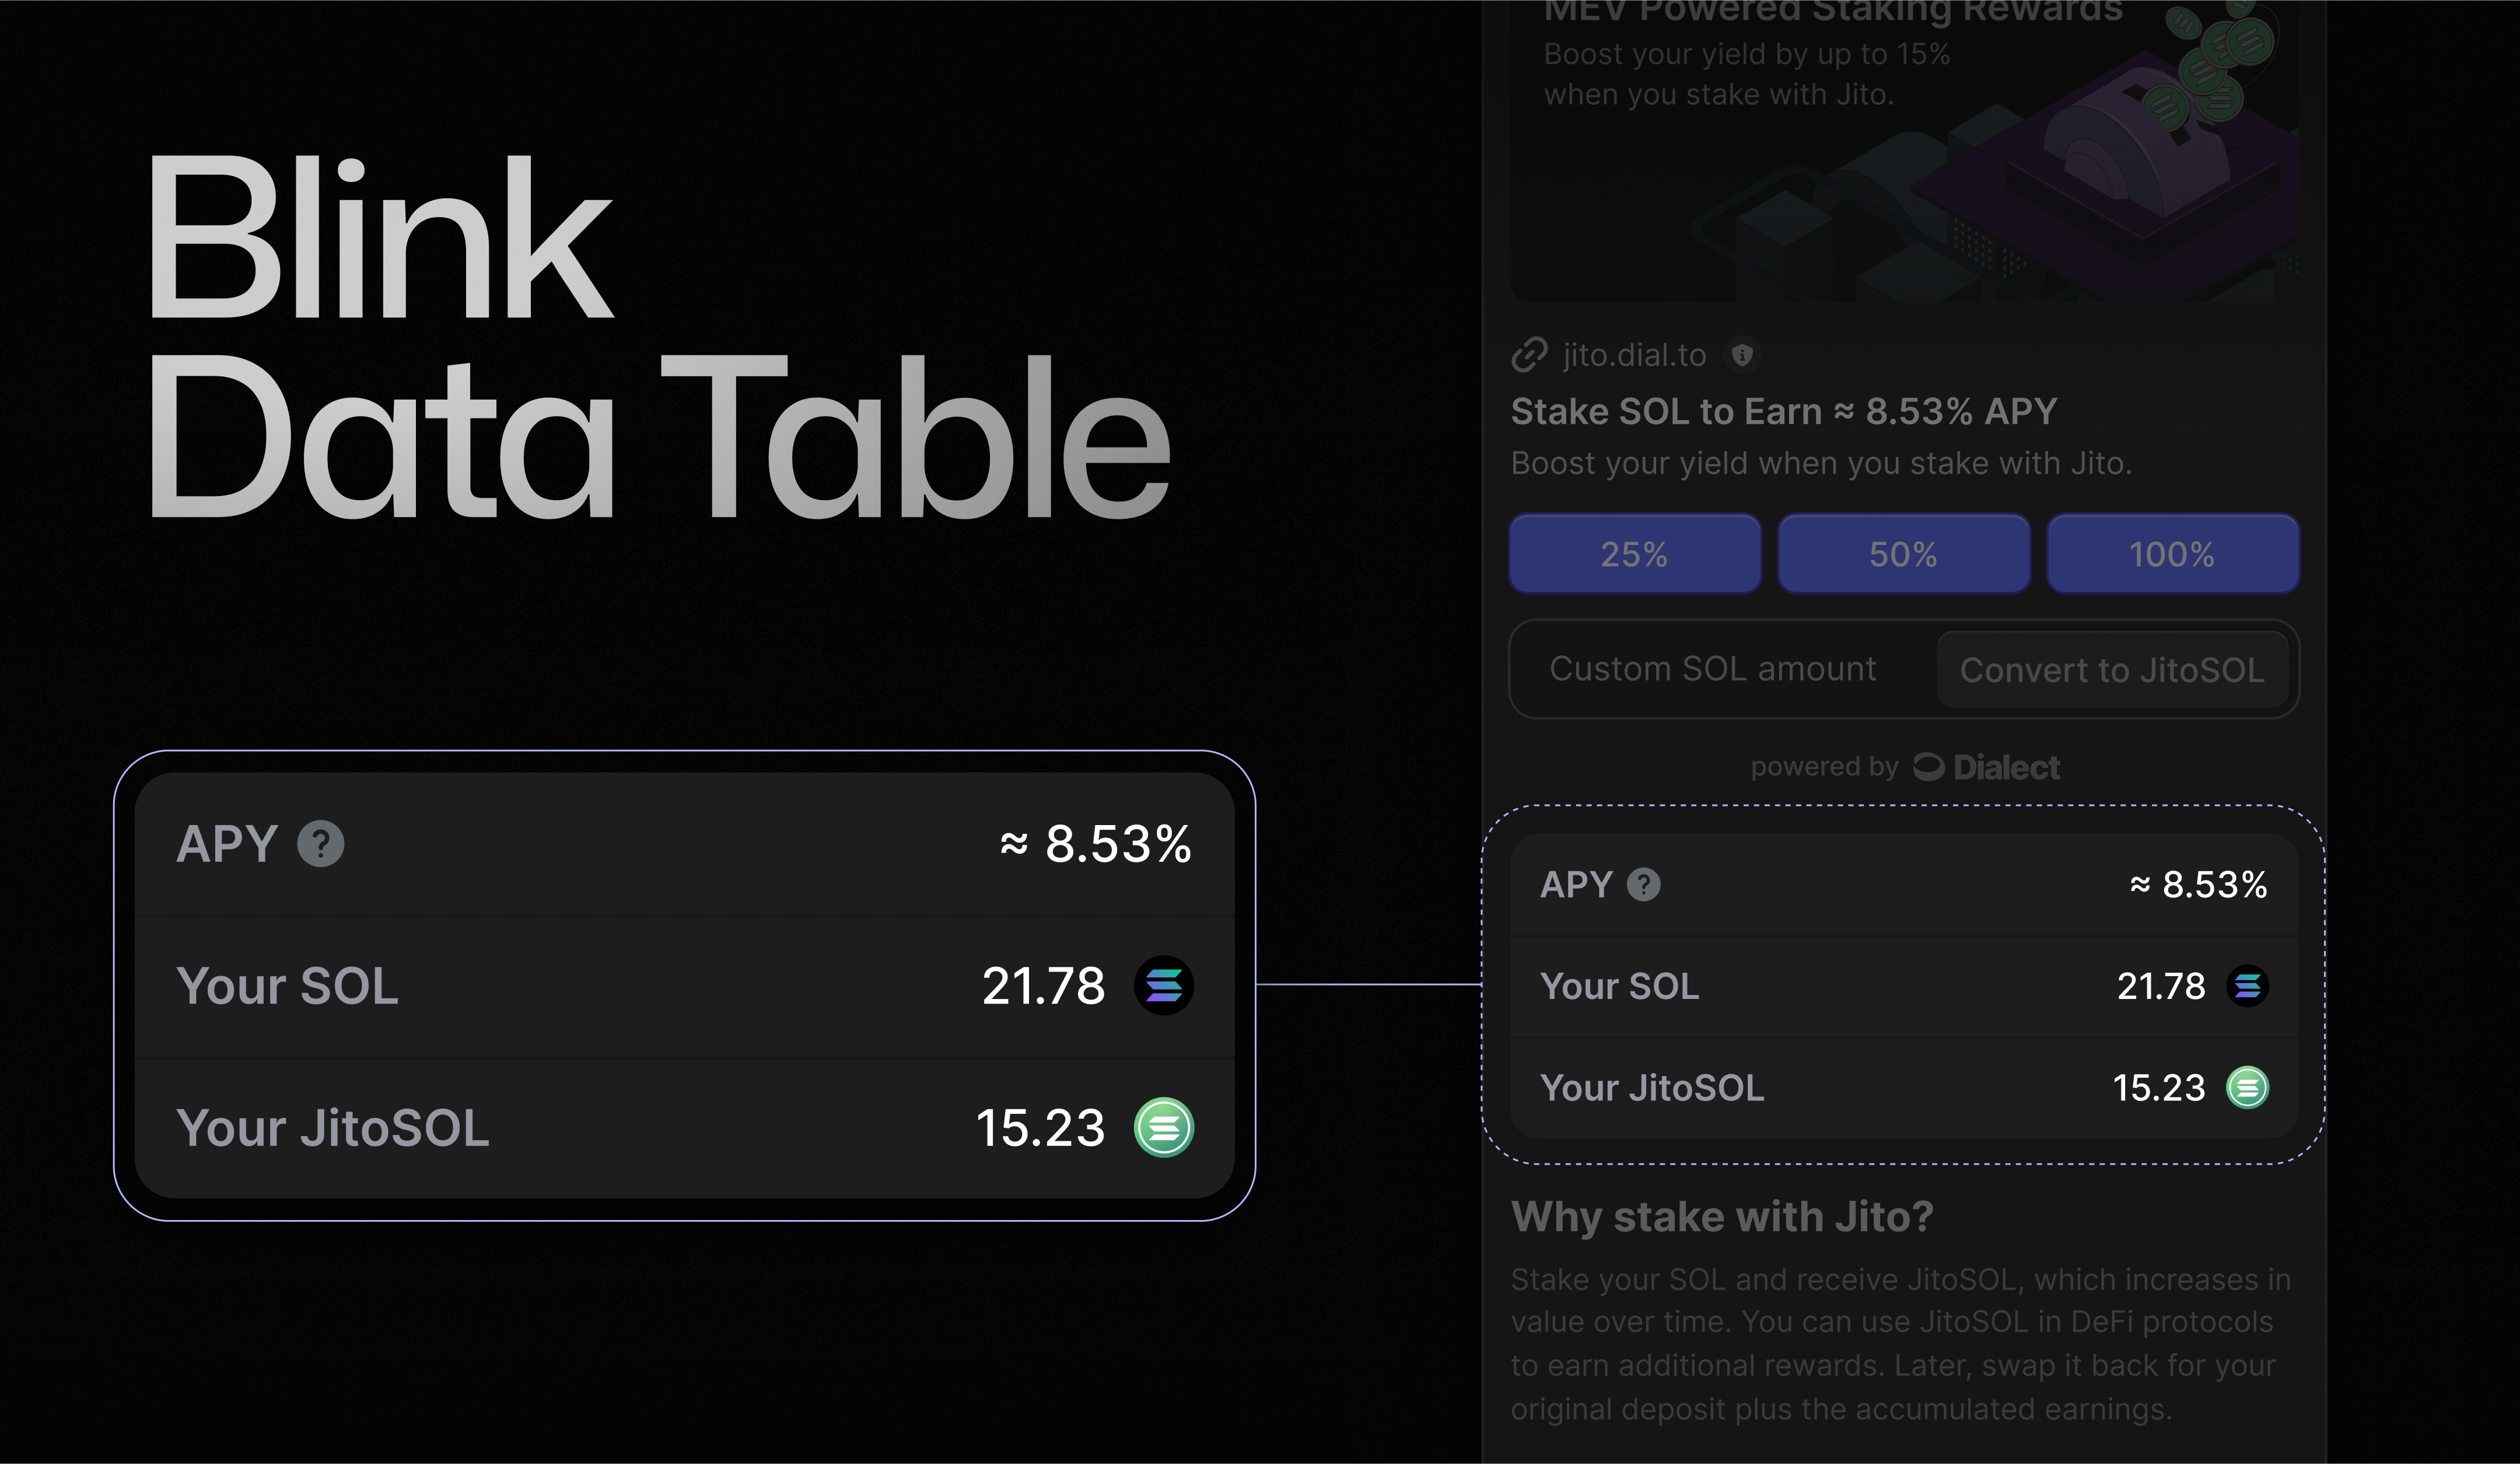
In addition to the Blink and BlinkPreview endpoints, we offer a BlinkDataTable endpoint. This can be used to highlight important information for your users, such as APY or balances.
Because BlinkDataTables are often compute-intensive, they have their own endpoint. This separation allows you to fetch them only when needed.
Fetching a BlinkPreview
BlinkPreview is a small, static set of data used to display relevant information about the blink. Consider it an opportunity to use marketing language and render a preview instead of the full blink - useful for lists or websites that don’t yet unfurl blinks.
It is recommended to use a separate 16:9 image for this preview.
POST requests
Once a user clicks on a button, the blink will send a POST request to your backend. This request always contains the wallet address (account) of the user. Additional data can be sent via the URL, e.g., by using URL parameters.
Example URL for POST: https://jito.dial.to/stake/percentage/25
In this blink, we use our example from the Jito staking blink again. Please note that the URL has changed from /stake (GET endpoint) to /stake/percentage (POST endpoint). The number 25 indicates that 25% of the user’s SOL balance will be staked.
There are no specific requirements for the design of your link structure or endpoints. Most blinks use the same endpoint for their GET and POST requests and utilize URL parameters to add extra values.
- Reducing the chances of incorrect implementations
- Providing a single point of maintenance
- Ensuring full control over the blink
Multi-Step Blinks: Action Chaining
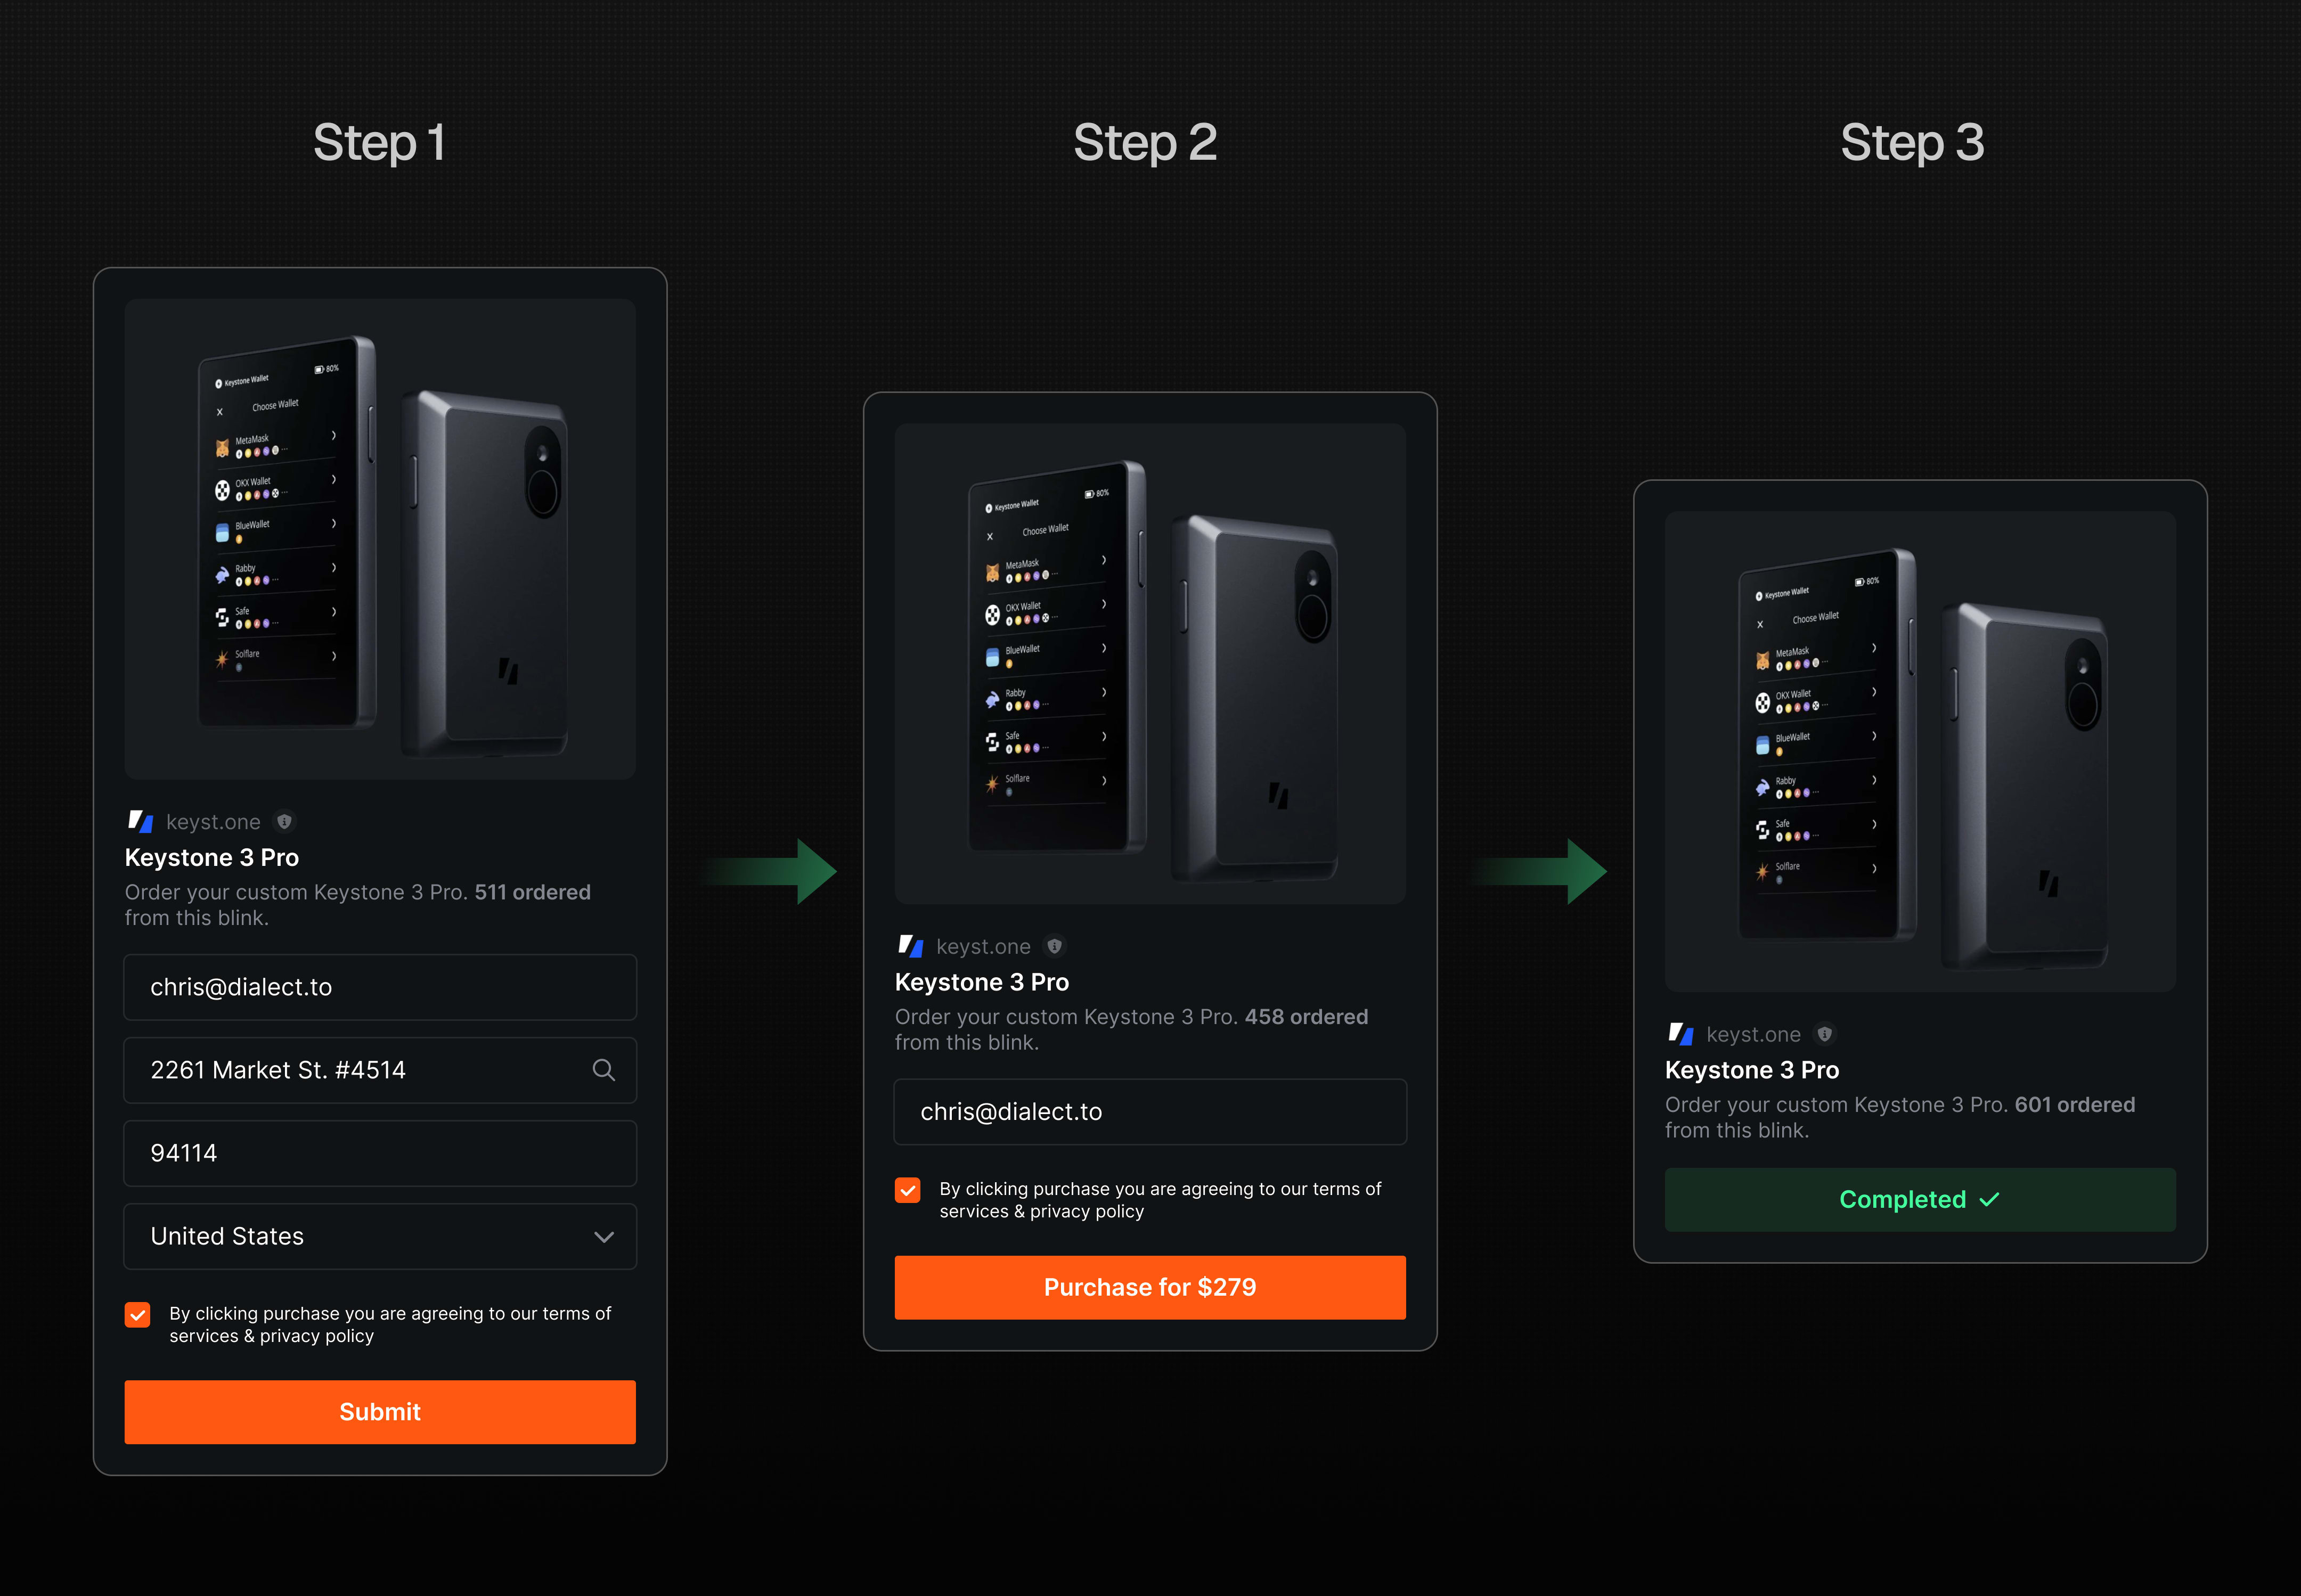 Action Chaining allows you to create complex workflows by connecting multiple blink actions in a sequential order. Instead of handling single, isolated actions, you can orchestrate a series of interconnected steps to create more complex user experiences.
Our SDKs are the recommended way to implement action chaining as they handle the complexity for you.
Action Chaining allows you to create complex workflows by connecting multiple blink actions in a sequential order. Instead of handling single, isolated actions, you can orchestrate a series of interconnected steps to create more complex user experiences.
Our SDKs are the recommended way to implement action chaining as they handle the complexity for you.
Handling Multiple Transactions (Experimental)
Some complex DeFi operations require multiple transactions to be executed sequentially. When a blink provider needs to return multiple transactions, the response will usetype: "transactions" instead of type: "transaction":
- Execute sequentially: Sign and submit each transaction in order, waiting for confirmation before proceeding
- Update cache (recommended): Refresh account state and balances between transactions to ensure accurate data
- Handle confirmations: Wait for each transaction to be confirmed on-chain before signing the next
- Update Blockhash: Fetch a fresh recent blockhash before signing the next transaction
- Manage failures: If any transaction fails, stop the sequence and handle the error appropriately
Transaction signing is the client’s responsibility. Dialect provides the transactions ready for signing, but implementing wallet interaction and signature collection is handled by your application using standard Solana libraries such as
@solana/web3.js, @solana/kit, or gill. (Single transactions can be handled by the blink client directly)Input types
Blinks can be more than just one-click button actions. In fact, they can become really powerful when you add multiple inputs. If you look at our Standard Blinks Library (SBL), you will find many blinks that feature radio buttons, dropdown menus, checkboxes, and much more. This allows you to build full-fledged forms or even games that run entirely on blinks.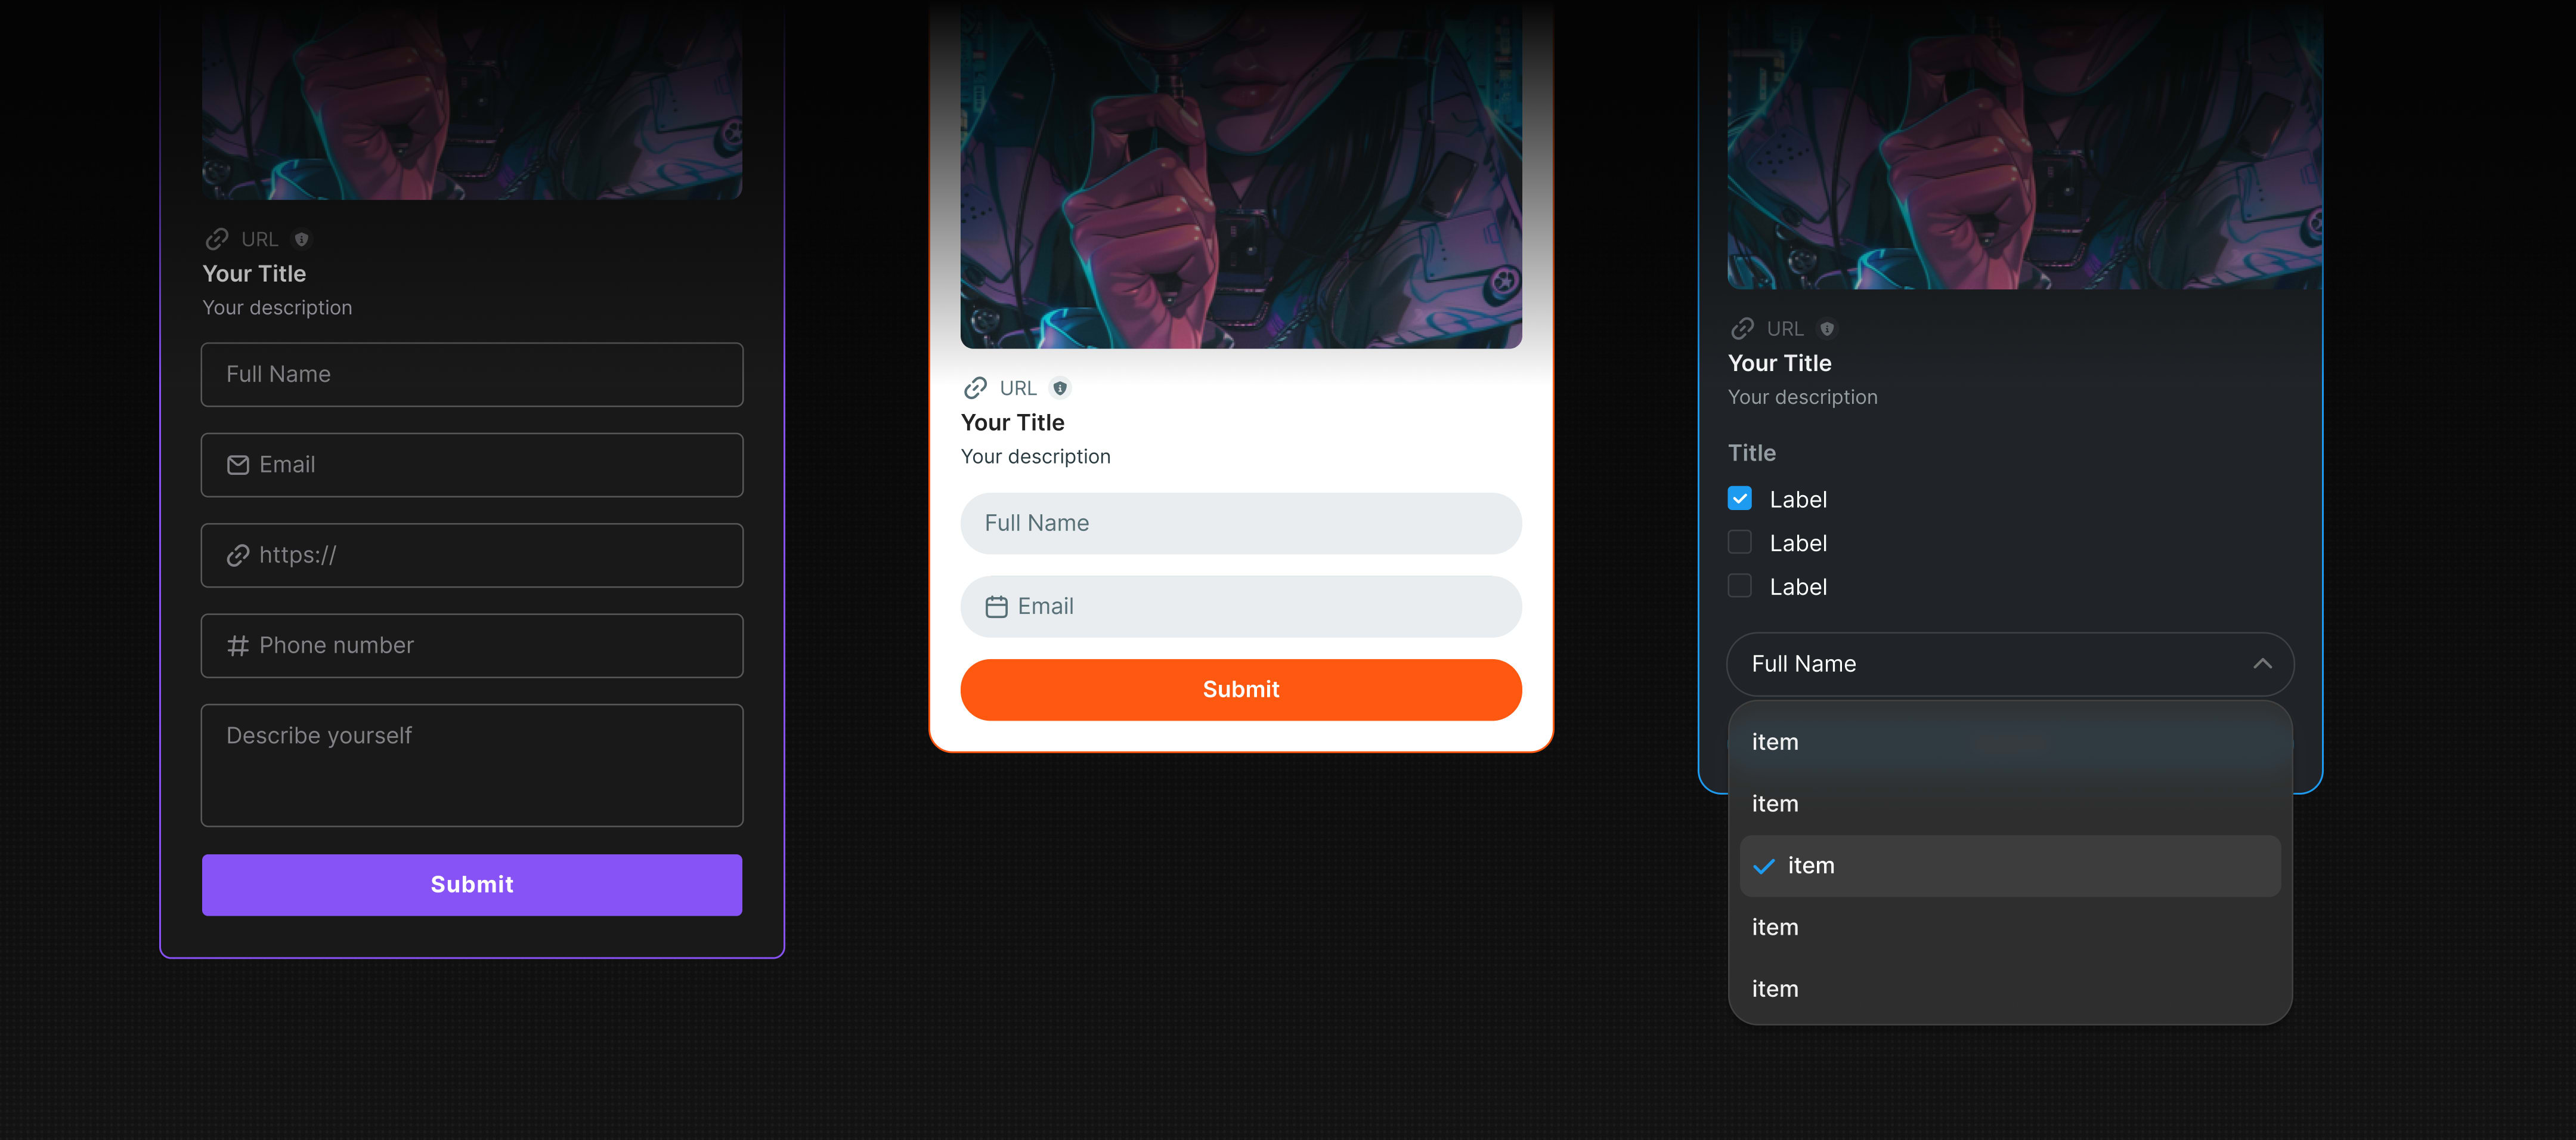 If you want to learn more about the input types that you can use for your blink, check out our forms section.
Wallets and Apps
As mentioned in thePOST section, blinks offer a fast and secure way to implement new services into your app, and implementation becomes even easier when using our UI component kits.
Many wallets have already chosen to use blinks instead of implementing each service for their users themselves.
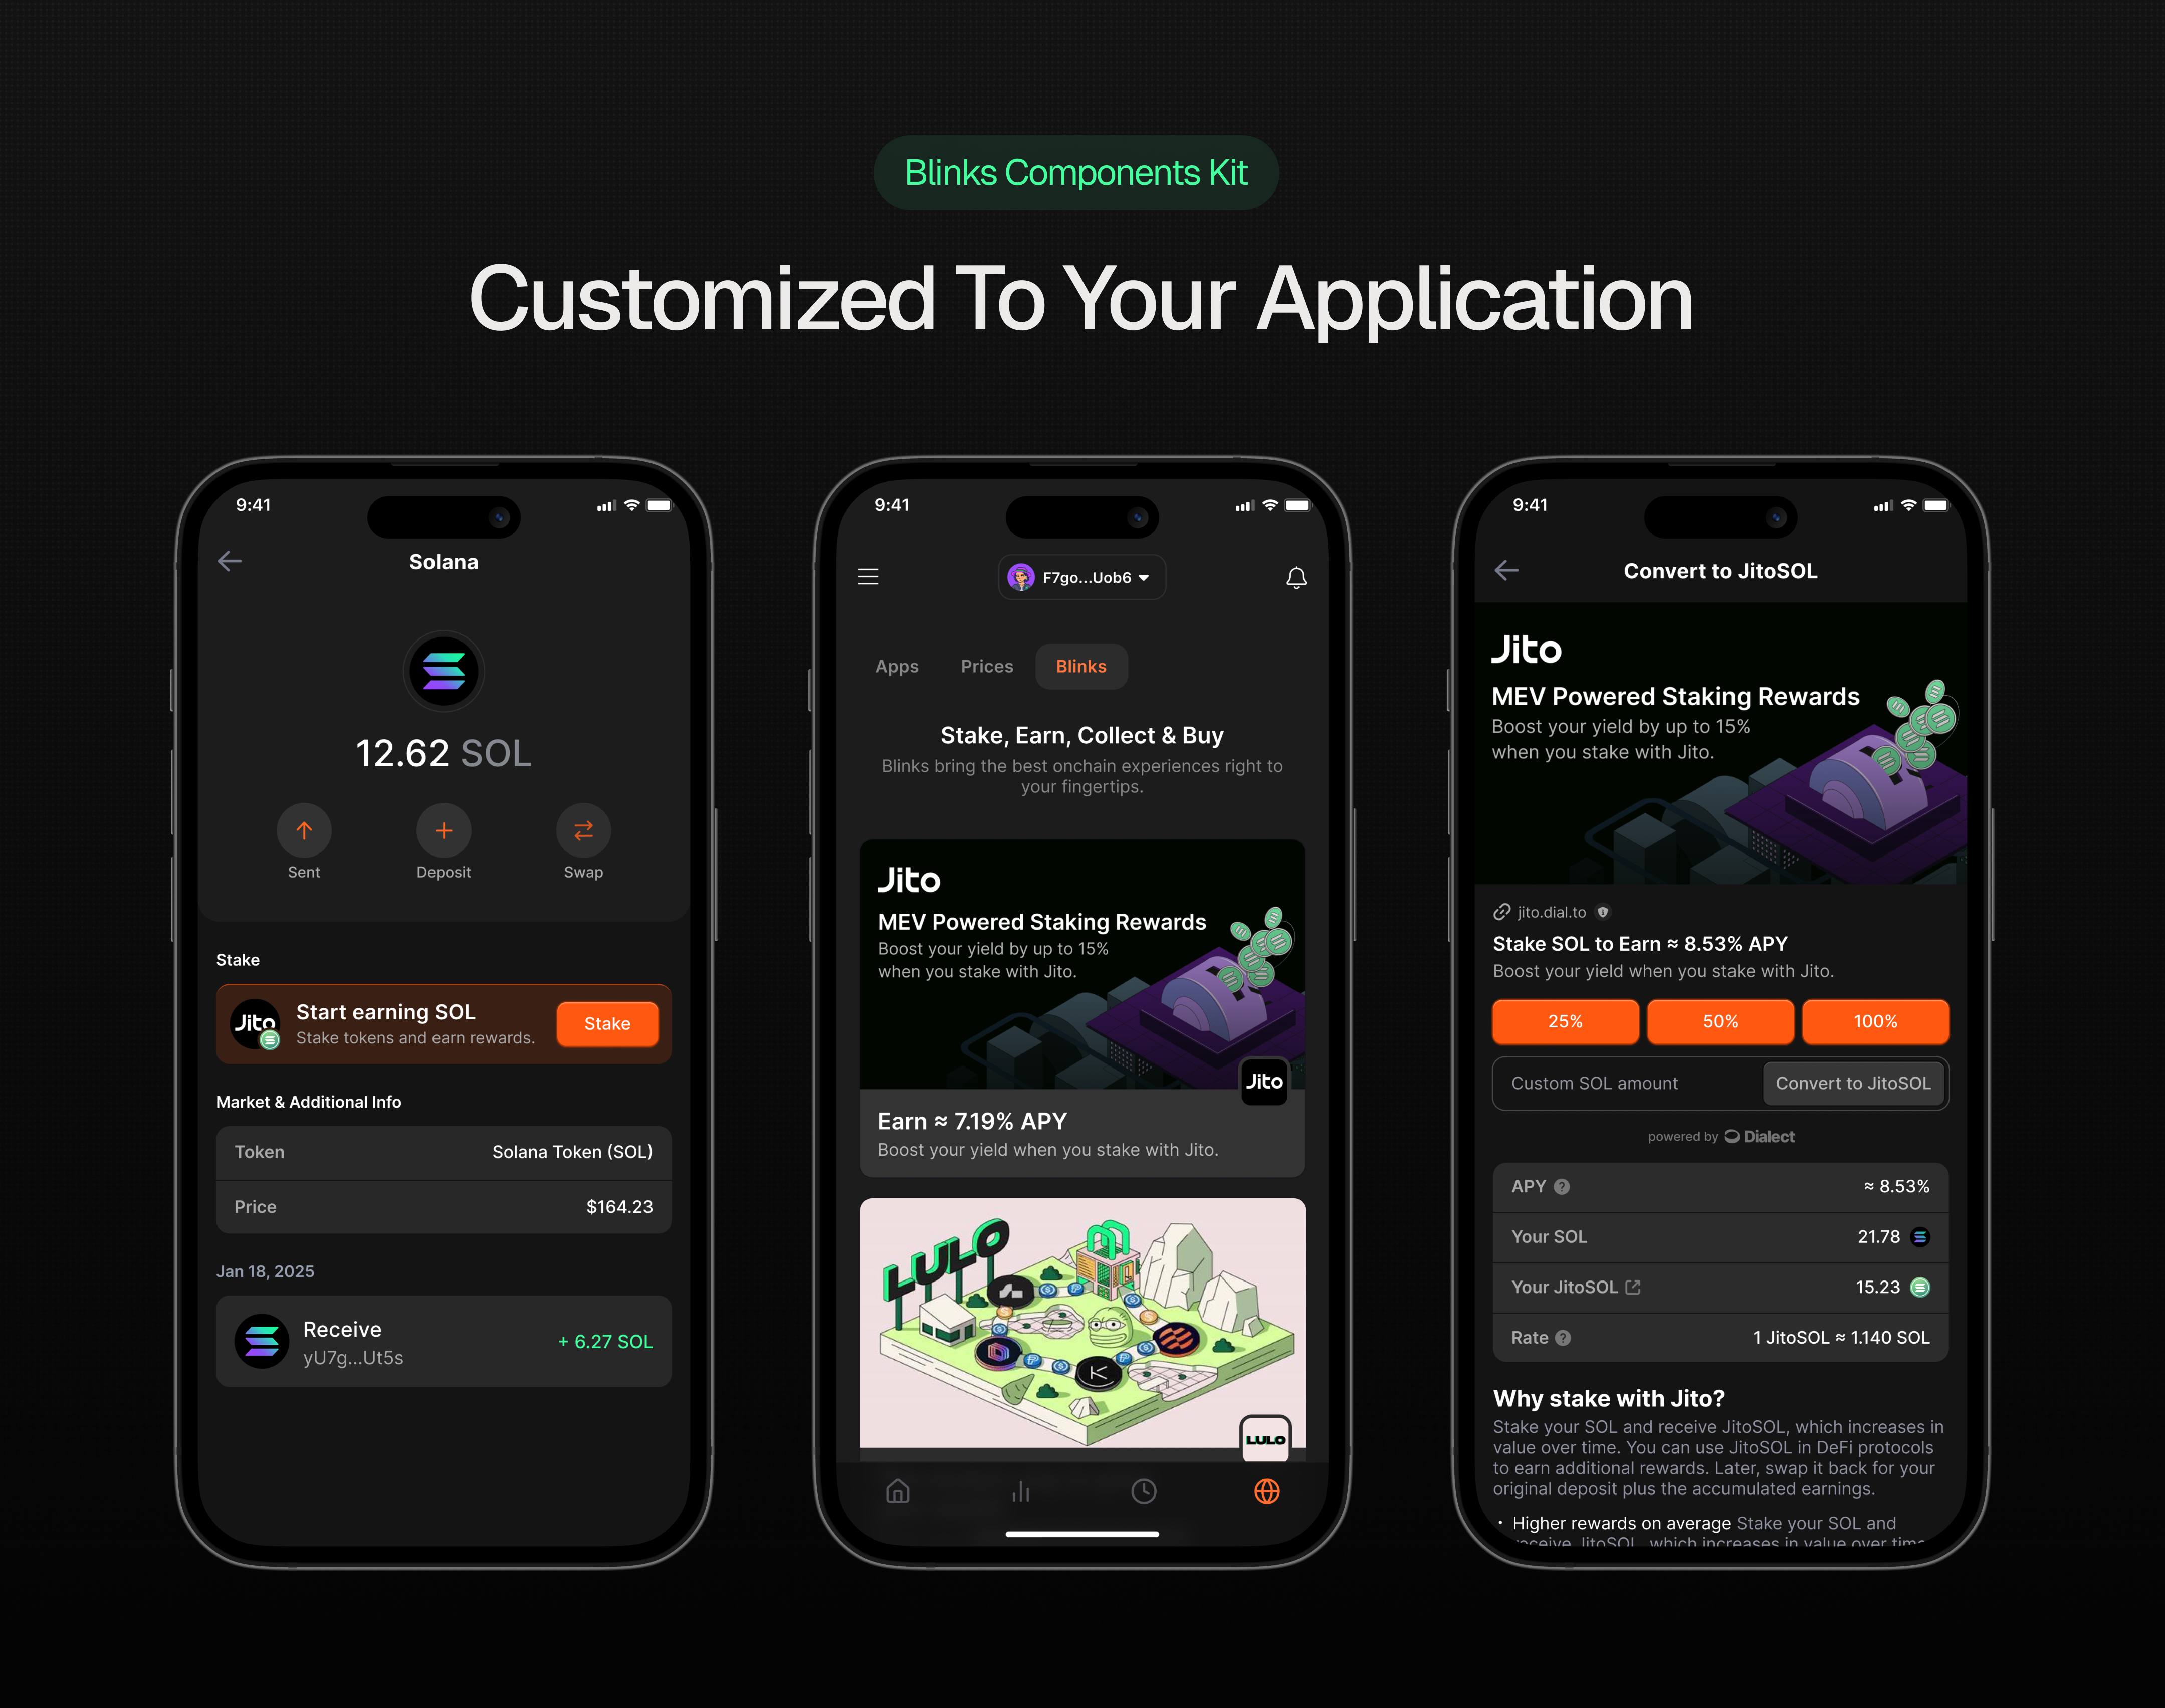 The blink UI component kits are available for React and React Native. Using our dashboard, you can remotely manage your app’s blinks: add new ones, change their order, and track their performance—all without deploying a new version of your app.
Our Standard Blinks Library (SBL) is the fastest way to discover all available blinks. From swapping and lending to staking and more, all blinks can be found there. They can be customized and integrated into your app with no-code solutions in just a few clicks.
The blink UI component kits are available for React and React Native. Using our dashboard, you can remotely manage your app’s blinks: add new ones, change their order, and track their performance—all without deploying a new version of your app.
Our Standard Blinks Library (SBL) is the fastest way to discover all available blinks. From swapping and lending to staking and more, all blinks can be found there. They can be customized and integrated into your app with no-code solutions in just a few clicks.