> ## Documentation Index
> Fetch the complete documentation index at: https://docs.dialect.to/llms.txt
> Use this file to discover all available pages before exploring further.
# Forms
> Build blinks with multiple inputs and advanced input types, similar to HTML forms with validation.
Forms allow you to build blinks with multiple inputs and advanced input types. They work similar to `HTML` forms, meaning you define input types, such as dropdowns, radio buttons, text, etc. and decide which input is required.
 Once the users have finished their inputs, they click on the submit button to send the data to your blinks provider.
Best part: Our blink components even check if the inputs were correct before sending them to your backend, so that you don't have to implement these checks again.
The following examples will show code examples for building forms. We will focus only on the `GET` part. They won't show how `POST` requests look like, because the `POST` interactions work the same way any other blink would. If yo want to see the `POST` part, it is recommended to go to our donation blink example.
Forms usually have multiple input fields. This means that you have to work with `linked actions` meaning you set your input params in the links object (see code example below).
## Transfer blink example
This example contains the code for the `GET` request of a SOL transfer blink. As you can see, the blink has two input fields.
Once the users have finished their inputs, they click on the submit button to send the data to your blinks provider.
Best part: Our blink components even check if the inputs were correct before sending them to your backend, so that you don't have to implement these checks again.
The following examples will show code examples for building forms. We will focus only on the `GET` part. They won't show how `POST` requests look like, because the `POST` interactions work the same way any other blink would. If yo want to see the `POST` part, it is recommended to go to our donation blink example.
Forms usually have multiple input fields. This means that you have to work with `linked actions` meaning you set your input params in the links object (see code example below).
## Transfer blink example
This example contains the code for the `GET` request of a SOL transfer blink. As you can see, the blink has two input fields.
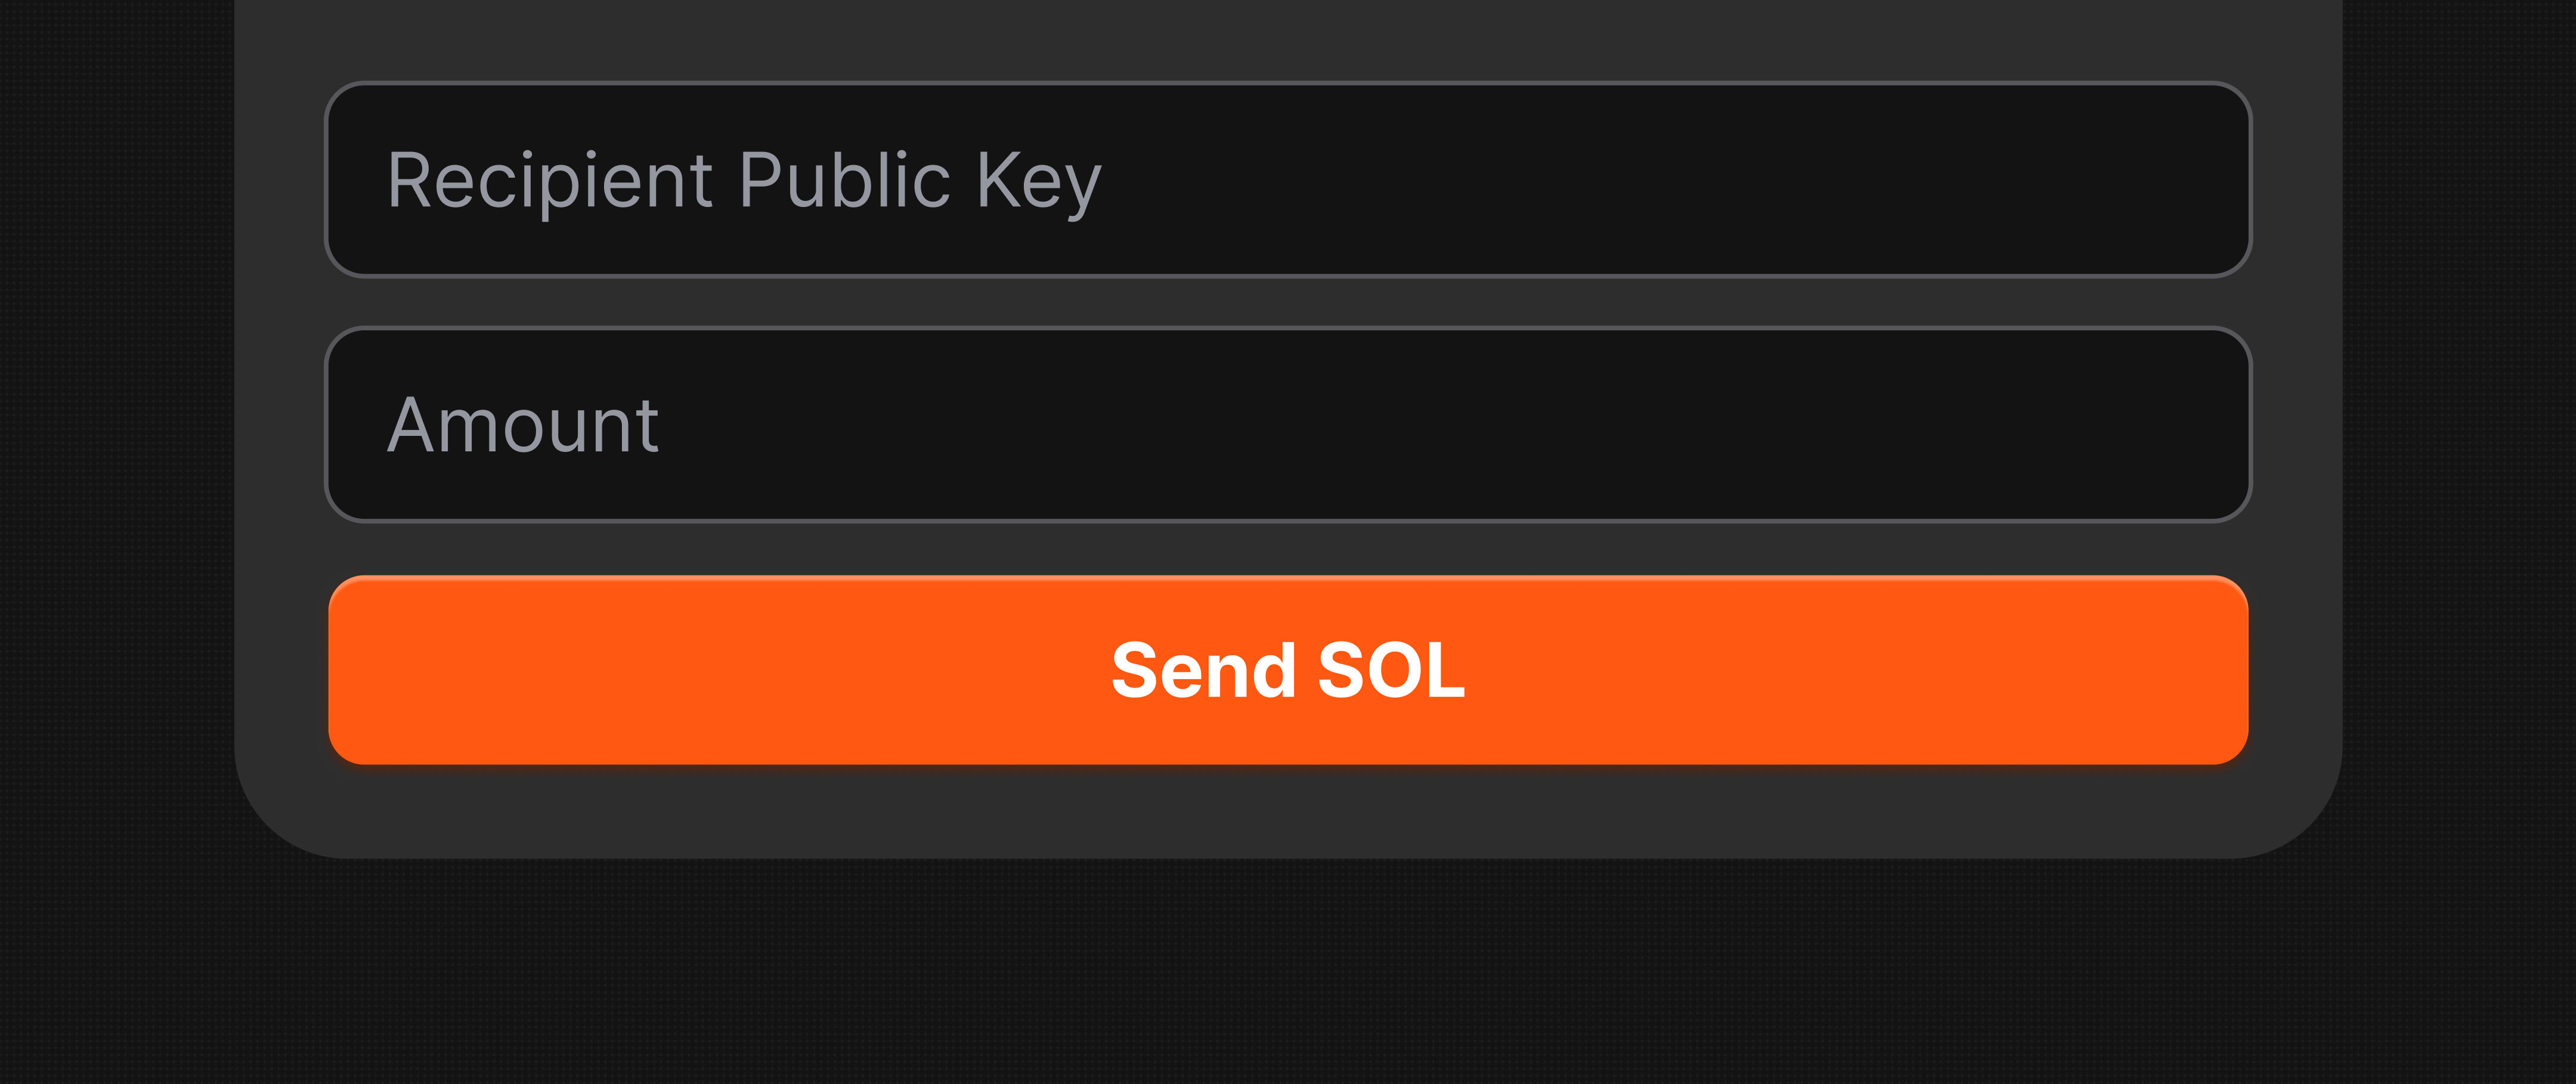 The first is a text input for the wallet address and the required tag ensures that no empty textfield can be submitted. Second input is a number ensuring that the SOL amount that should be transferred is a number.
```typescript theme={null}
// GET request for SOL transfer blink
export const GET = async (req: Request) => {
const response: ActionGetResponse = {
type: "action",
icon: `${new URL("/transfer-sol.png", req.url).toString()}`,
label: "Send SOL",
title: "Send SOL with a Blink",
description:
"This Blink demonstrates how to send SOL on the Solana blockchain. It is a part of the official Blink Starter Guides by Dialect Labs. \n\nLearn how to build this Blink: https://docs.dialect.to/blinks/blinks-provider/build-your-first-blink",
// If you have multiple inputs
links: {
actions: [
{
type: "transaction", // Defines this as a blockchain transaction
label: "Send SOL",
// This is the endpoint for the POST request
href: "/api/transfer-sol?receiver={receiver}&amount={amount}",
// Required user inputs
parameters: [
{
type: "text",
label: "Recipient Public Key",
name: "receiver",
required: true, // Sets input as required
},
{
type: "number", // Input is number, checks this in frontend
label: "Amount",
name: "amount",
required: true, // Sets input as required
},
],
},
],
},
};
// Return the response with proper headers
return new Response(JSON.stringify(response), {
status: 200,
headers,
});
};
```
## Advanced input types
The example above shows a very basic blink that transfers SOL to another Solana address. As already discussed in this section, there are more input types than text and numbers, which we refer to as advanced input types.
The following advanced input types are available:
* `text`
* `email`
* `URL`
* `numbers`
* `dates`
* `date-times`
* `checkboxes`
* `radio buttons`
* `text areas`
* `select`
## Advanced input examples
Below are more examples that showcase how you can use advanced input types in your code. For full blink examples make sure you visit our [guides section](/blinks/blinks-provider/guides).
### Dropdown and radio buttons
```typescript theme={null}
const payload: ActionGetResponse = {
title: "Alice's Adventures",
icon: "",
label: "Donate SOL",
description: "Cybersecurity Enthusiast | Sign up for my newsletter!",
links: {
actions: [
{
label: "Sign Up", // button text
href: "/api/donate?amount={amount}&choice={choice}",
parameters: [
{
type: "select",
name: "amount", // parameter name in the `href` above
label: "Donation Amount in SOL", // placeholder of the text input
required: true,
options: [
{ label: "1", value: "1" },
{ label: "5", value: "5" },
{ label: "10", value: "10" },
],
},
{
type: "radio",
name: "choice", // parameter name in the `href` above
label: "Do you want to sign up for our newsletter", // placeholder of the text input
required: true,
options: [
{ label: "Yes", value: "1" },
{ label: "No", value: "0" },
],
},
],
},
],
},
};
```
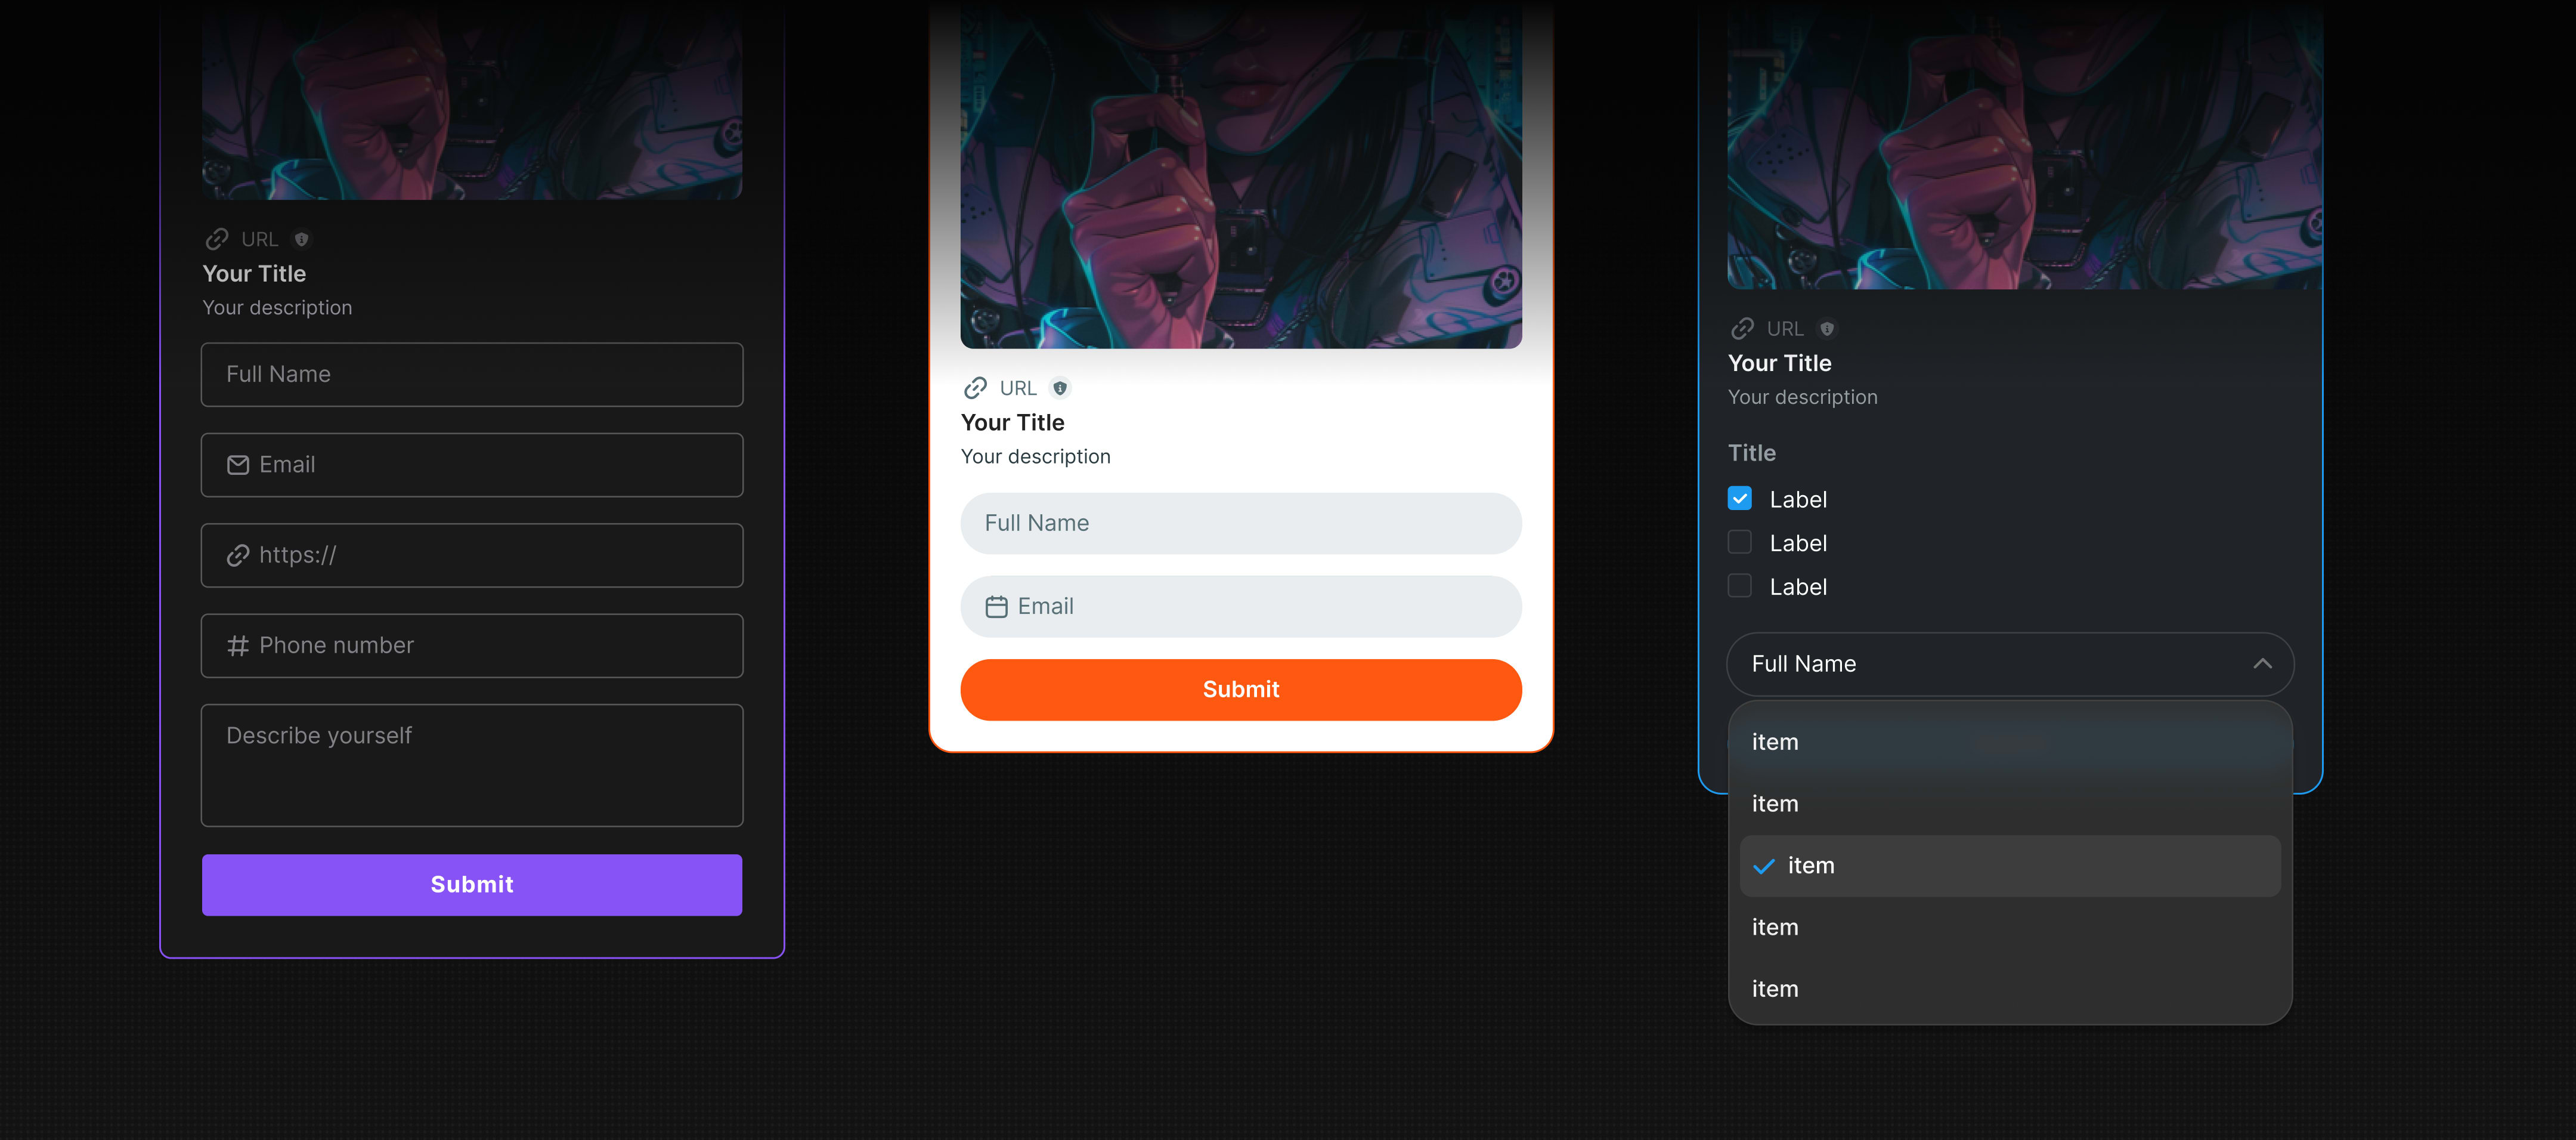
Here's what that would look like when unfurled:
The first is a text input for the wallet address and the required tag ensures that no empty textfield can be submitted. Second input is a number ensuring that the SOL amount that should be transferred is a number.
```typescript theme={null}
// GET request for SOL transfer blink
export const GET = async (req: Request) => {
const response: ActionGetResponse = {
type: "action",
icon: `${new URL("/transfer-sol.png", req.url).toString()}`,
label: "Send SOL",
title: "Send SOL with a Blink",
description:
"This Blink demonstrates how to send SOL on the Solana blockchain. It is a part of the official Blink Starter Guides by Dialect Labs. \n\nLearn how to build this Blink: https://docs.dialect.to/blinks/blinks-provider/build-your-first-blink",
// If you have multiple inputs
links: {
actions: [
{
type: "transaction", // Defines this as a blockchain transaction
label: "Send SOL",
// This is the endpoint for the POST request
href: "/api/transfer-sol?receiver={receiver}&amount={amount}",
// Required user inputs
parameters: [
{
type: "text",
label: "Recipient Public Key",
name: "receiver",
required: true, // Sets input as required
},
{
type: "number", // Input is number, checks this in frontend
label: "Amount",
name: "amount",
required: true, // Sets input as required
},
],
},
],
},
};
// Return the response with proper headers
return new Response(JSON.stringify(response), {
status: 200,
headers,
});
};
```
## Advanced input types
The example above shows a very basic blink that transfers SOL to another Solana address. As already discussed in this section, there are more input types than text and numbers, which we refer to as advanced input types.
The following advanced input types are available:
* `text`
* `email`
* `URL`
* `numbers`
* `dates`
* `date-times`
* `checkboxes`
* `radio buttons`
* `text areas`
* `select`
## Advanced input examples
Below are more examples that showcase how you can use advanced input types in your code. For full blink examples make sure you visit our [guides section](/blinks/blinks-provider/guides).
### Dropdown and radio buttons
```typescript theme={null}
const payload: ActionGetResponse = {
title: "Alice's Adventures",
icon: "",
label: "Donate SOL",
description: "Cybersecurity Enthusiast | Sign up for my newsletter!",
links: {
actions: [
{
label: "Sign Up", // button text
href: "/api/donate?amount={amount}&choice={choice}",
parameters: [
{
type: "select",
name: "amount", // parameter name in the `href` above
label: "Donation Amount in SOL", // placeholder of the text input
required: true,
options: [
{ label: "1", value: "1" },
{ label: "5", value: "5" },
{ label: "10", value: "10" },
],
},
{
type: "radio",
name: "choice", // parameter name in the `href` above
label: "Do you want to sign up for our newsletter", // placeholder of the text input
required: true,
options: [
{ label: "Yes", value: "1" },
{ label: "No", value: "0" },
],
},
],
},
],
},
};
```
Here's what that would look like when unfurled:
